When it comes to retrieving data client-side using Javascript the Dynamics 365 Web API is the best way to do this. In this post I’m going to share a reusable Javascript function I’ve written that makes using the Web API and retrieving data a breeze.
I’ll also step through an example based on the lead form and the existing contact field. Click here to jump straight to the example.
About the Dynamics 365 Web API
The Dynamics 365 Web API is a HTTP REST API which provides CRUD (Create, Read, Update and Delete) access to Dynamics (amongst other things). Because it’s built on open standards it can be used across a wide variety of programming languages and platforms. In this post I’ll be showing you how to use it to retrieve data in real-time and then use that data to populate fields on a form.
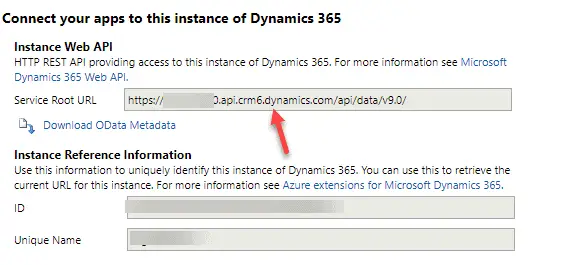
To get your Dynamics 365 Web API URL, head to:
- Settings | Customizations | Developer Resources
- It will be the first URL on the left:
I’ve included some useful links at the end of this post if you would like to read more about the Web API’s capabilities.
How to Retrieve Data using the Web API
I’ve written the reusable functions below to make retrieving data via the Web API a sinch. Simply copy and paste it into a new JScript web resource and then include the web resource on the Dynamics 365 form you wish to call it from.
Note: when including it on a form, ensure it’s positioned before the calling script within the Form Properties window.
|
1 2 3 4 5 6 7 8 9 10 11 12 13 14 15 16 17 18 19 20 21 22 23 24 25 26 27 28 29 30 31 32 33 34 35 36 37 38 39 40 41 42 43 44 45 46 47 48 49 50 51 52 53 |
function retrieveWebAPIData(sEntityName, sColumns, sFilter, sOrderBy) { var serverUrl = Xrm.Page.context.getClientUrl(); var ODATA_ENDPOINT = "/api/data/v9.0"; var odataUri = serverUrl + ODATA_ENDPOINT + "/" + sEntityName + "?"; if (sColumns) { odataUri += "$select=" + sColumns; } if (sFilter) { odataUri += "&$filter=" + sFilter; } if (sOrderBy){ odataUri += "&$orderby=" + sOrderBy; } var data; try { var req = new XMLHttpRequest(); //alert(odataUri); req.open("GET", encodeURI(odataUri), false); req.setRequestHeader("Accept", "application/json"); req.setRequestHeader("Content-Type", "application/json; charset=utf-8"); req.send(null); data = JSON.parse(req.responseText, dateReviver); return data; } catch (ex){ alert("Error: retrieveWebAPIData - Data Set =" + odataSetName + "; filter = " + sFilter + "; select = " + sSelect + "; Error = " + ex.message); } } function dateReviver(key, value) { if (typeof value === 'string') { var a = /^(\d{4})-(\d{2})-(\d{2})T(\d{2}):(\d{2}):(\d{2}(?:\.\d*)?)Z$/.exec(value); if (a) { return new Date(Date.UTC(+a[1], +a[2] - 1, +a[3], +a[4], +a[5], +a[6])); } } return value; }; |
The retrieveWebAPIData is the function to call to query data and accepts the following variables:
- sEntityName = a string containing the name of the entity being queried
- sColumns= a comma-separated string containing the fields to be retrieved
- sFilter = an optional string containing the query filter (where clause)
- sOrderBy = an optional string containing the query sort order
The other function (dateReviver) is used to revive (properly format) any dates passed back in the JSON response.
The following code snippet is a sample on how to use it (note there’s a full example of this code below). In the sample I pull fields from the contact entity using a contact ID as a filter:
|
1 2 3 4 5 6 7 8 9 10 11 12 13 |
//Entity name var sEntityName = "contacts"; // Select field names: var sColumns= "firstname,lastname,fullname,telephone1,emailaddress1"; // Where clause filter var sFilter = "contactid eq 9e17b0be-9a01-47b4-bc0c-5afd788f9334"; var sOrderBy = ""; //Call the retrieve function var requestResults = retrieveWebAPIData(sEntityName, sColumns, sFilter, sOrderBy); |
WebAPI Query Gotchas
In regards to putting together the Web API query there’s a couple of things to keep in mind:
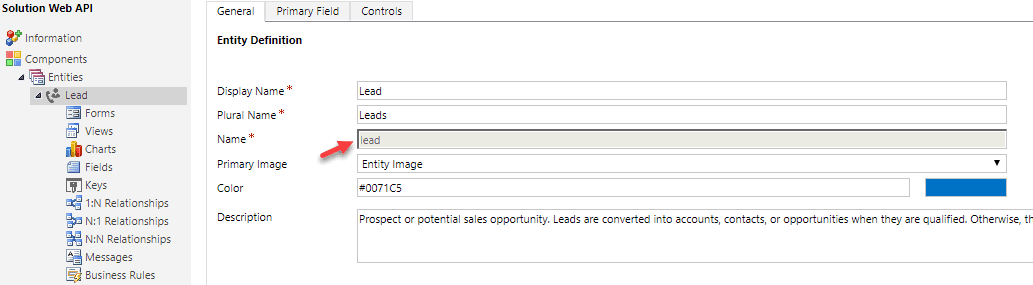
- The entity name (sEntityName variable) is the schema name of the entity. For example, Lead is leads. It’s usually plural and lower case, but it’s always good to check from the customization area if you are unsure:
- The fields names that the select statement (sSelect variable) uses is actually the field name as per the customization area (usually all lowercase) e.g. the Lead’s Description field is “description”:

- Lookup fields within the select statement (sSelect variable) must be prefixed with an underscore and suffixed with “_value”. For example, the Customer ID field (customerid) on the Lead entity would be: _customerid_value
- When dealing with record IDs (GUIDs) within the where clause (sFilter variable) be sure to strip the brackets “{” and “}” from the value otherwise it will fail with the following error:
A binary operator with incompatible types was detected. Found operand types ‘Edm.Guid‘ and ‘Edm.String’ for operator kind ‘Equal’.”,”innererror“:{“message“:”A binary operator with incompatible types was detected. Found operand types ‘Edm.Guid‘ and ‘Edm.String’ for operator kind ‘Equal’.”,”type”:”Microsoft.OData.ODataException”
How to use it (with example)
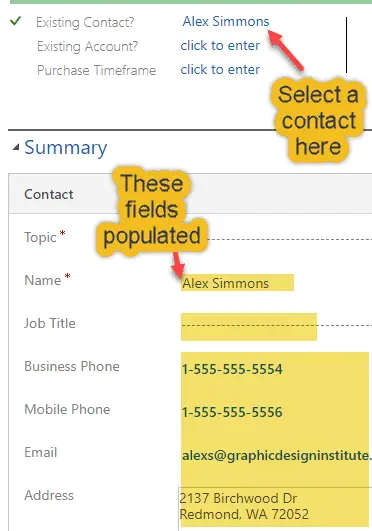
For the example below I’ll use the Dynamics 365 Web API on the Lead form to retrieve contact data and populate the following contact related fields on the lead when the Existing Contact field is populated:
- Name (Full name)
- Business Phone
- Mobile Phone
- Job Title
- Address 1 (composite field)
Here’s what it will look like once the Existing Contact is selected from the Process:
- Firstly copy and paste the 2 functions in the code sample above into a new web resource (JScript) called “Retrieve Data” and publish it:
- Name = RetrieveData
- Display Name = Retrieve Data
- Type = Script (JScript)
- Copy and paste the following script into a new web resource (JScript) which we will call Lead and publish it:
- Name = Lead
- Display Name = Lead Script
- Type = Script (JScript)
|
1 2 3 4 5 6 7 8 9 10 11 12 13 14 15 16 17 18 19 20 21 22 23 24 25 26 27 28 29 30 31 32 33 34 35 36 37 38 39 40 41 42 43 44 45 46 47 48 49 50 51 52 53 54 55 56 57 58 59 60 61 62 63 64 65 66 67 68 69 70 71 72 73 74 75 76 77 78 79 80 81 82 83 84 85 86 87 88 89 90 91 92 93 94 95 96 97 98 99 100 101 102 103 104 105 106 107 108 109 110 111 112 113 114 115 116 117 118 119 120 121 122 123 124 125 126 127 128 129 130 131 132 133 134 135 136 137 138 139 140 141 142 143 144 145 146 147 148 |
function setExistingContact() { //Get the contact record from the Existing Contact field var oExistingContact = new Array; oExistingContact = Xrm.Page.getAttribute("parentcontactid").getValue(); //Check to see if there's a value: if (oExistingContact != null) { var sContactID = oExistingContact[0].id; //Remove brackets from the GUID - otherwise this will cause an error: sContactID = sContactID.replace("{", ""); sContactID = sContactID.replace("}", ""); //Entity name var sEntityName = "contacts"; // Select field names: var sColumns = "firstname,lastname,fullname,telephone1,emailaddress1,mobilephone,jobtitle,address1_city,address1_line1,address1_line2,address1_line3,address1_stateorprovince,address1_postalcode"; // Prepare filter var sFilter = "contactid eq " + sContactID; var sOrderBy = ""; //Query the data var requestResults = retrieveWebAPIData(sEntityName, sColumns, sFilter, sOrderBy); //Loop through the results (there should only be one in this case): if (requestResults != null) { if (requestResults.value != null && requestResults.value.length > 0) { for (var indRecordLoop = 0; indRecordLoop < requestResults.value.length; indRecordLoop++) { var oContact = requestResults.value[indRecordLoop]; //Check returned data field for a value: if(oContact.lastname) { //Set the form field value: Xrm.Page.getAttribute("lastname").setValue(oContact.lastname); } if(oContact.firstname) { Xrm.Page.getAttribute("firstname").setValue(oContact.firstname); } if(oContact.fullname) { Xrm.Page.getAttribute("fullname").setValue(oContact.fullname); } else { Xrm.Page.getAttribute("fullname").setValue(Xrm.Page.getAttribute("firstname").getValue() + " " + Xrm.Page.getAttribute("lastname").getValue()); } if(oContact.emailaddress1) { Xrm.Page.getAttribute("emailaddress1").setValue(oContact.emailaddress1); } if(oContact.telephone1) { Xrm.Page.getAttribute("telephone1").setValue(oContact.telephone1); } if(oContact.mobilephone) { Xrm.Page.getAttribute("mobilephone").setValue(oContact.mobilephone); } if(oContact.jobtitle) { Xrm.Page.getAttribute("jobtitle").setValue(oContact.jobtitle); } var sAddress = ""; if(oContact.address1_line1) { Xrm.Page.getAttribute("address1_line1").setValue(oContact.address1_line1); sAddress = oContact.address1_line1; } else { sAddress = "\r\n"; } if(oContact.address1_line2) { Xrm.Page.getAttribute("address1_line2").setValue(oContact.address1_line2); sAddress += "\r\n" + oContact.address1_line2; } else { sAddress += "\r\n"; } if(oContact.address1_line3) { Xrm.Page.getAttribute("address1_line3").setValue(oContact.address1_line3); sAddress += "\r\n" + oContact.address1_line3; } else { sAddress += "\r\n"; } if(oContact.address1_city) { Xrm.Page.getAttribute("address1_city").setValue(oContact.address1_city); sAddress += "\r\n" + oContact.address1_city; } else { sAddress += "\r\n"; } if(oContact.address1_stateorprovince) { Xrm.Page.getAttribute("address1_stateorprovince").setValue(oContact.address1_stateorprovince); sAddress += "\r\n" + oContact.address1_stateorprovince; } else { sAddress += "\r\n"; } if(oContact.address1_postalcode) { Xrm.Page.getAttribute("address1_postalcode").setValue(oContact.address1_postalcode); sAddress += "\r\n" + oContact.address1_postalcode; } else { sAddress += "\r\n"; } //Set Address1 composite field value: Xrm.Page.getAttribute("address1_composite").setValue(sAddress); } } } } } |
- Add both scripts to the Lead form and ensure the RetrieveData script is above the Lead script:
- From the lead form in edit mode, select Form Properties
- Click the + Add button within the Form Libraries section
- Search for the RetrieveData script and click Add
- Click the +Add button within the Form Libraries section
- Search for the Lead script and click Add
- Click ok
- If the “Parent Contact for lead” field is not on the form, drag it onto any section
- Select it and click Change Properties
- Uncheck Visible by default. Since the field is going to be used from the Process we don’t need to see it on the form. However, we do need it on there so we can add an OnChange event.
- Select the Events tab
- Click +Add
- In the library drop down select the Lead script and enter the following text for the function: setExistingContact
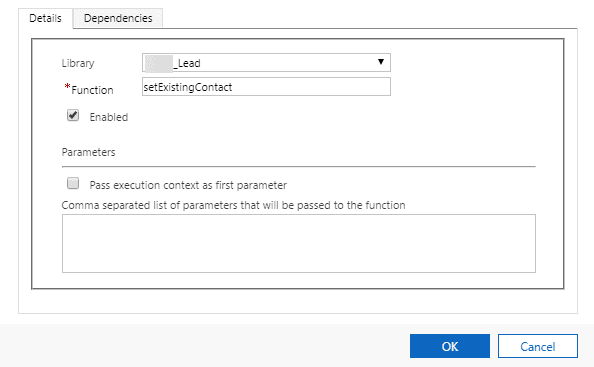
- Click Ok
- Click Ok on the Field Properties window
- Click Save
- Click Publish
That’s it. Head to the lead form to test your change.
Note that you may need to clear your browser cache to get the latest script changes.
Any questions or issues, please leave a comment below.
Useful Links
- Getting Started:
- Dynamics 365 Basic Web API Samples:
- Web API Operations:
Glenn,
Sir! great article! however, it would be even more useful if the text was selectable. or could be copied… the images above aren’t actual text, in a display container that allows left-right scrolling, and selection of text.
thanks, and keep’em coming…
dave
Hi Dave,
Thanks for the feedback! I’ll do just that.
Cheers, Glenn