NOTE: The information in this post is out of date since administration of Dynamics 365 has moved to the Power Platform interface. Updated instructions can be found at the following URL:
Microsoft Dynamics 365 – Managing Admin Mode from Power Platform
A function that I love within Microsoft Dynamics 365 is the fact you can push a copy of your Production instance (including customizations and data) to a separate Sandbox environment. This process is relatively fast and simple (note the overall time comes down to the size of the production instance).
If you would like to jump directly to the instructions, click here.
What is a Sandbox Instance / Environment?
A “Sandbox” environment is a separate testing environment which hosts untested code changes. It’s isolated from Production so that any issues with the untested code do not affect the live instance.
Generally speaking the Sandbox is used to stage and test code changes in order to obtain sign-off for rolling them into Production.
How to make a new Sandbox copy
Whether or not you have access to a Sandbox environment comes down to your level of license within Dynamics 365. At the time of writing this post an Enterprise license will allow for one Sandbox. I believe extra Sandbox environments can be purchased via an extra subscription license.
A common scenario why a Sandbox is to be refreshed with Production is to bring down the latest data and code from the live system. This can be used as a fresh baseline for new work and development.
In order to spin up a new Sandbox or create a new copy the Office 365 user you use to do this must have either a “Dynamics 365 Service Administrator” role or be a Global Admin.
Note: the copy function is available on instances 100Gb or smaller. For larger instances contact Microsoft support.
Warning: This process will overwrite the current Sandbox, be sure to back up any customizations prior to completing this.
To create a new copy:
- Log into the Office portal (https://portal.office.com/adminportal/home)
- Navigate to Admin Centers | Dynamics 365

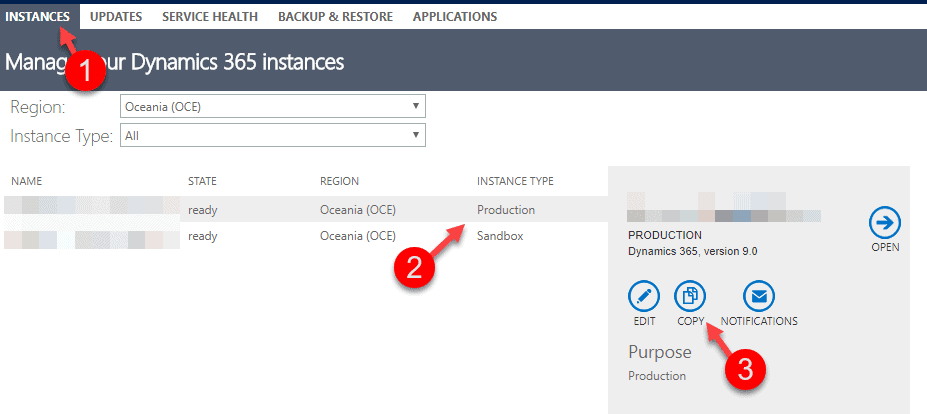
- From the Instances tab select the Production instance and click Copy
Note: that it does not matter if there is currently a Sandbox – this process will overwrite it.
- Within the “Copy Instance” form:
-
-
- Select Sandbox from the Target instance
- Under Copy Type select either Full copy or Minimal copy
- Full Copy = Copies all data and customizations
- Minimal Copy = Copies only the customizations and schema (excludes data)
- Change the Name if needed
- Change the the URL if needed
- Note if this changes the old address will continue to work for 24 hours.
- Enter a Purpose – since 99% of the time it’s for a sandbox I put “Sandbox” here.
- Security group:
- <p “padding-left:=”” 50px;”=””>Leave this blank to copy all users with a DYN365 license over to the sandbox, this is what I usually do.
OR
- Click Copy
<p “padding-left:=”” 50px;”=””>Select a Office 365 security group – this will create a DYN365 user within the Sandbox for all users within the specified security group
-
That’s it, let it do it’s thing. In my experience the process should take around 10-20 minutes.
What Next? Administration mode…
Once the new copy is complete and online, the instance is automatically put in Administration mode with background operations disabled. This means that asynchronous operations like workflows and email (Exchange) synchronisation.
When Administration mode is enabled only System Administrators or System Customizers will be able to log in and the following message will be displayed:
Administration Mode Enabled
Only system administrators and system customizers can sign in at this time. You can turn this mode off in the Dynamics 365 Administration Center.

Disable Administration Mode
To disable Administration mode:
- Log into the Office portal (https://portal.office.com/adminportal/home)
- Navigate to Admin Centers | Dynamics 365
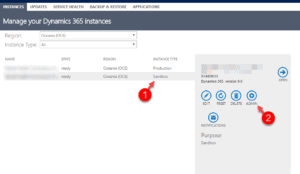
- From the Instances tab select the Sandbox instance and click Admin
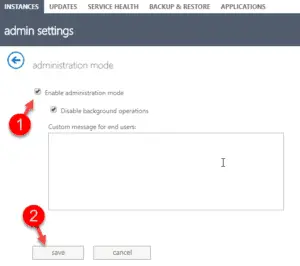
- Uncheck “Enable administration mode”
- Click Save
Admin Settings Explained
Enable administration mode: Turns administration mode on / off
Disable background operations: Check to disable asynchronous operations such as workflows and email (Exchange) synchronisation within the instance
Custom message for end users: Enter a custom message which will be displayed to end users if they try to log into the instance when administration mode is on (i.e. users without Administrator or System Customizer roles).
It’s in reality a nice and helpful piece of info. I’m satisfied that you simply shared this helpful info with us. Please stay us informed like this. Thank you for sharing.